Two More in the Mix
Posted: Tue Sep 02, 2008 10:50 pm
Here's some of my latest work:
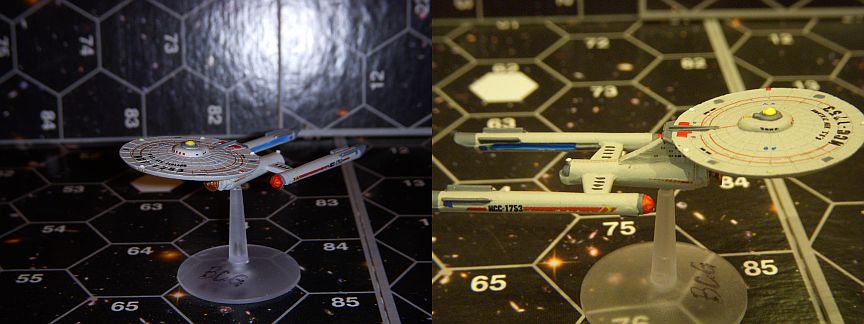
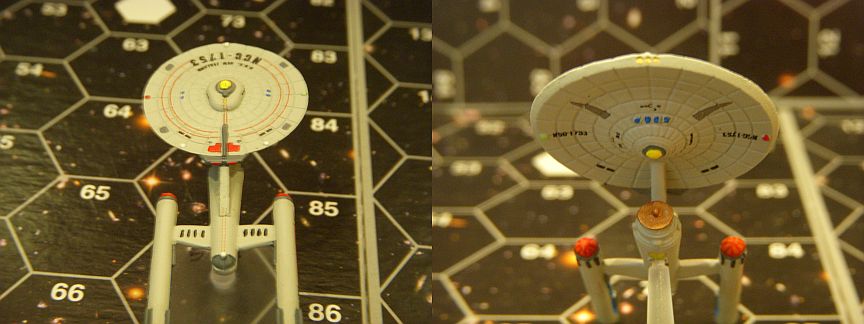
A Federation Kirov Class Heavy Battlecruiser, with extra drones, the USS New Zealand Set 1 and Set 2.
I used the CC Saucer here for several reasons. First, because it's nice, second, because I'm borrowing the saucer for another mini, and third/fourth, it differentiates it nicely from my BCJ, since the neck isn't there and I like drones as hatches on the hull, like a sub launching missiles versus torpedoes.
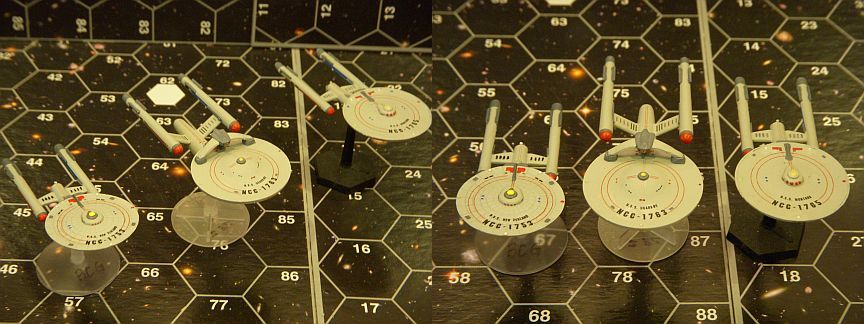
Here’s a pic of all three of my Heavy Battlecruisers. From left to right, the BCG New Zealand, kitbahsed BCF Nikolai V. Orarkov, and BCJ New Jersey.
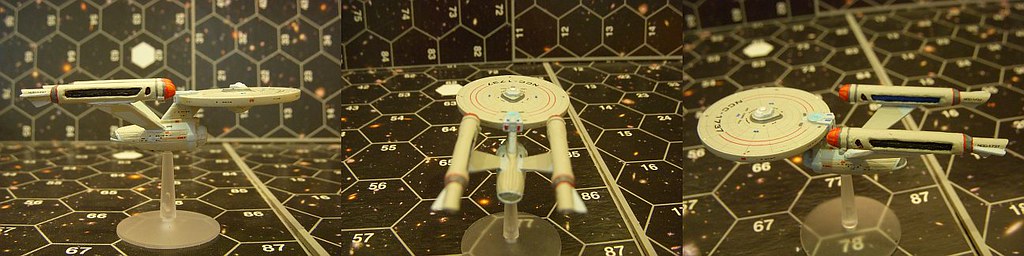
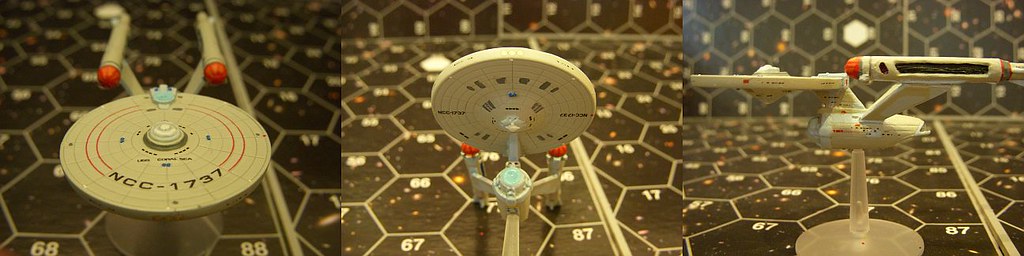
And, my latest prize………a Federation Heavy Command Cruiser, the USS Coral Sea.
Montage A
Montage B
Montage C
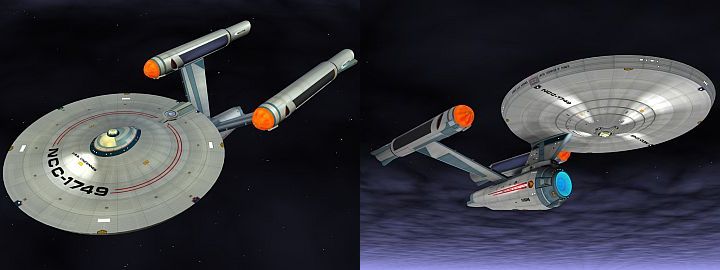
I based this one off of a model made as a MOD for SFC1, 2, and OP, as well as Bridge Commander that I found later in 2007. I loved it instantly, and decided to make a mini out of it, again almost instantly (took a while to get it right, see below). The model was made by a gentleman named Rod Oneal. If you play these games still, I’d highly suggest getting this MOD—it’s fantastic! Check out the pics of the MOD here and here.
Here’s a copy of Rod’s blurb as to why he made this particular model:
This design is based off the conjecture that the refit seen in “Star Trek the Motion Picture� was too dramatic to have been a single design upgrade. In Starfleet Battles there is an interim refit between the Command Cruiser (the last refit of the Enterprise before TMP) and the 1st generation X ships (generally accepted as the TMP refit), the CB or heavy command cruiser. The command cruiser U.S.S. Vincennes received this refit before receiving the X refit, where as the Enterprise did not. It went directly to the X-cruiser design. Often there wasn’t enough time to get to every vessel before another upgrade came along. This is my interpretation of what that class might have looked like.
The nacelles were somewhat tricky—I went through them many times. In fact, the ones on the ship currently are the third iteration of them. I got the ends easily enough, just some tubing cut at an angle with some plastic card added for fins. The real trouble to get right were the TMP-style cutouts on the sides. The first nacelles just used plastic tubing sanded flat on the sides, but I overdid it and made the sides too flat to really match the original mini. So I scrapped them after I put the mini together and didn’t like them. They’re on a FASA Loknar that I got without engines now and that will be used as a Command Light Cruiser (pics to follow sometime in the future).
The second set also just had filed down tubing as nacelles, but this time I didn’t make the indents as deep. These made it onto the mini and got painted before I scrapped them for the current ones. These are on the bench awaiting some new project (perhaps something like Rick Smith’s Shanks Class NCL), once I order more plastic Tug saucers from ADB…(I think I’ve gone through about 15 now…8)). The third and current incarnation of the nacelles is actually that same plastic tubing with the sides cut out of it. The black/blue surface is actually the same tube as the narrower end of the nacelle, just lengthened inside. I think this one came out the best, and closest to Rod’s model.
I wasn’t initially a fan of the “two-tone� paint scheme that I see kicked around online for TMP ships, but as I began painting this one, it just seemed that I had too use it--Rod’s model was way too nice for me not to! I’m really happy with how this one came out finally, and I hope you all enjoy it too.
A Federation Kirov Class Heavy Battlecruiser, with extra drones, the USS New Zealand Set 1 and Set 2.
I used the CC Saucer here for several reasons. First, because it's nice, second, because I'm borrowing the saucer for another mini, and third/fourth, it differentiates it nicely from my BCJ, since the neck isn't there and I like drones as hatches on the hull, like a sub launching missiles versus torpedoes.
Here’s a pic of all three of my Heavy Battlecruisers. From left to right, the BCG New Zealand, kitbahsed BCF Nikolai V. Orarkov, and BCJ New Jersey.
And, my latest prize………a Federation Heavy Command Cruiser, the USS Coral Sea.
Montage A
Montage B
Montage C
I based this one off of a model made as a MOD for SFC1, 2, and OP, as well as Bridge Commander that I found later in 2007. I loved it instantly, and decided to make a mini out of it, again almost instantly (took a while to get it right, see below). The model was made by a gentleman named Rod Oneal. If you play these games still, I’d highly suggest getting this MOD—it’s fantastic! Check out the pics of the MOD here and here.
Here’s a copy of Rod’s blurb as to why he made this particular model:
This design is based off the conjecture that the refit seen in “Star Trek the Motion Picture� was too dramatic to have been a single design upgrade. In Starfleet Battles there is an interim refit between the Command Cruiser (the last refit of the Enterprise before TMP) and the 1st generation X ships (generally accepted as the TMP refit), the CB or heavy command cruiser. The command cruiser U.S.S. Vincennes received this refit before receiving the X refit, where as the Enterprise did not. It went directly to the X-cruiser design. Often there wasn’t enough time to get to every vessel before another upgrade came along. This is my interpretation of what that class might have looked like.
The nacelles were somewhat tricky—I went through them many times. In fact, the ones on the ship currently are the third iteration of them. I got the ends easily enough, just some tubing cut at an angle with some plastic card added for fins. The real trouble to get right were the TMP-style cutouts on the sides. The first nacelles just used plastic tubing sanded flat on the sides, but I overdid it and made the sides too flat to really match the original mini. So I scrapped them after I put the mini together and didn’t like them. They’re on a FASA Loknar that I got without engines now and that will be used as a Command Light Cruiser (pics to follow sometime in the future).
The second set also just had filed down tubing as nacelles, but this time I didn’t make the indents as deep. These made it onto the mini and got painted before I scrapped them for the current ones. These are on the bench awaiting some new project (perhaps something like Rick Smith’s Shanks Class NCL), once I order more plastic Tug saucers from ADB…(I think I’ve gone through about 15 now…8)). The third and current incarnation of the nacelles is actually that same plastic tubing with the sides cut out of it. The black/blue surface is actually the same tube as the narrower end of the nacelle, just lengthened inside. I think this one came out the best, and closest to Rod’s model.
I wasn’t initially a fan of the “two-tone� paint scheme that I see kicked around online for TMP ships, but as I began painting this one, it just seemed that I had too use it--Rod’s model was way too nice for me not to! I’m really happy with how this one came out finally, and I hope you all enjoy it too.