WYN fleet
Moderators: Albiegamer, mjwest
-
John Schneder II

- Lieutenant SG
- Posts: 102
- Joined: Sun Jan 28, 2007 6:06 pm
- Location: Cincinnati, OH
- Contact:

-
markgeorgetwo

- Lieutenant Commander
- Posts: 372
- Joined: Tue Nov 21, 2006 5:01 pm
- Location: london england
post subject
nice one the bees knees my friend 
 .
.

-
John Schneder II
- Lieutenant SG
- Posts: 102
- Joined: Sun Jan 28, 2007 6:06 pm
- Location: Cincinnati, OH
- Contact:
Thanks again for the compliments everyone 
Mazza,
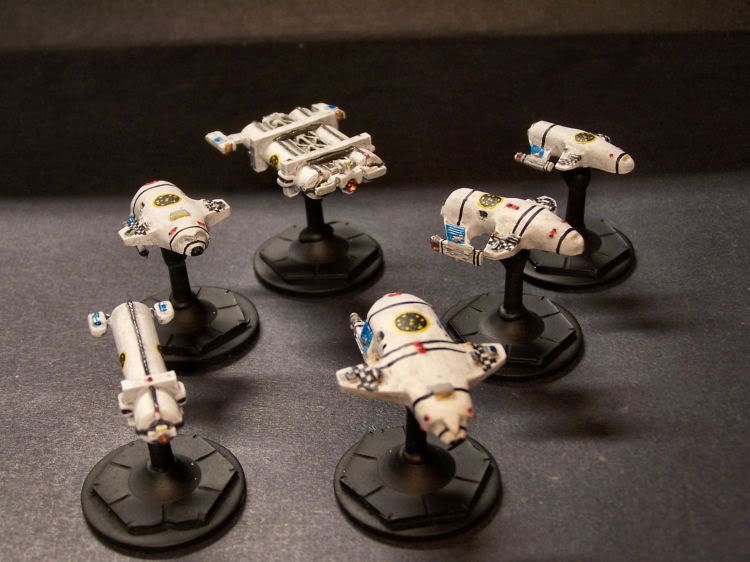
Those are bases for the B10 battleship with a large washed superglued to the bottom for weight. The B10 stands can be bought separately on the legacy site, under "Miniatures: Other" I think. What you also can't see from the picture is the small rare earth magnets we use to hold them to the base so they are removed easily for storage and transport.
Mazza,
Those are bases for the B10 battleship with a large washed superglued to the bottom for weight. The B10 stands can be bought separately on the legacy site, under "Miniatures: Other" I think. What you also can't see from the picture is the small rare earth magnets we use to hold them to the base so they are removed easily for storage and transport.
One of the guys that sculpts the minis (Starline 2400) 
John,
I'd be interested in how you are using magnets to hold things together. Is the post fixed permanently to the base, and the magnet holds the ship to the post, or is the post permanently attached to the mini?
I've been trying to solve the issue of how to have minis be easily removable from the stand for transport, but be securely fastened for play.
-
John Schneder II
- Lieutenant SG
- Posts: 102
- Joined: Sun Jan 28, 2007 6:06 pm
- Location: Cincinnati, OH
- Contact:
Toastie,
First, I make the top of the base wider with some epoxy putty (the same I use for sculpting). I sand it flat and as level as I can. I then glue a magnet to the top of the base. I then drill and install two alignment pins in front of and behind the magnet. I glue a magnet to the bottom of the mini, and drill two corresponding holes to match the pins. We found that while a magnet holds quite tight, you can spin the mini on it rather easily, and since so many of the minis are long, it became a problem, so I made the pins. I'll take a picture of a completed stand and post it here later.
A similar setup is sold by a company called Ninja Magic. Of course theirs is much nicer, but its also more expensive, LOL. Since my gaming group (we keep the minis at my house since that's where we play) has over 250 minis so far, the Ninja Magic setup would have cost us into the hundreds of dollars.
If you opt to do this yourself, learn from a few of my mistakes. First, make sure you have what I called a "master stand". This is simply any old plastic stand with a magnet glued to the top. by using this as a guide, you will always keep the poles of the magnets you use from interfering with each other. Nothing more discouraging than having you nicely painted mini all finished, and it is repelled by the stand rather than sticking to it, LOL. Also invest in a good pair of non-magnetic tweezers so you can place the magnets easily, especially since super glue would rather stick to your finger than either the mini or the magnet.
In the long run, this has worked pretty good for us, much better than the glued in stand, or the not-glued in stand and the mini flopping around. Plus, we didn't have to make as many stands as minis, only 50 or so as we figured if we had 50 minis on the map its probably too much any way.
Our original intent is to have an all-magnetic map, where the surface will have magnets stick to it, and we'll have drones, plasmas, shuttles, everything with some sort of magnet so it sticks to the map. Of course, this is a bit over the top, but since we are playing FC/SFB without hexes anyway, whats a little more effort:-)
One of the guys that sculpts the minis (Starline 2400)

Excellent job John. I Love the detail.
Do you find it as hard to use white or off/white paint as I do? For me it doesn't spread as even as some of the other colors do. I am using water based paints. Any tips?
I once used small magnets before for a GW model that I made for my nephew. I kept dropping and loosing them since they were so small. I believe it cost me a small fortune. Still picking the super glue off of my fingers.
-
John Schneder II
- Lieutenant SG
- Posts: 102
- Joined: Sun Jan 28, 2007 6:06 pm
- Location: Cincinnati, OH
- Contact:
Malleman,
Yeah, white is a real pain. I usually actually kmake the white base coat off white to start (white mixed with some light grey). Not too dark, just enough so when its next to white you can see a difference. Then I use a light grey/water shading wash, then highlight with a very bright titanium white. Sometimes (and you can't really see it on the WYN but you can see it on my LDR ships) I use a white pearl paint and just lightly run the paintbrush over the raised edges of the mini. In real life, you can see that the white "pops", even at playing distance.
Yeah, white is a real pain. I usually actually kmake the white base coat off white to start (white mixed with some light grey). Not too dark, just enough so when its next to white you can see a difference. Then I use a light grey/water shading wash, then highlight with a very bright titanium white. Sometimes (and you can't really see it on the WYN but you can see it on my LDR ships) I use a white pearl paint and just lightly run the paintbrush over the raised edges of the mini. In real life, you can see that the white "pops", even at playing distance.
One of the guys that sculpts the minis (Starline 2400)